Hollow shaft encoder is also known as hollow encoder. When installing this type of encoders, it is necessary to avoid rigid connection with the encoder. Please refer to the instructions for the size of the installation shaft. When installing, the encoder should be gently pushed into the quilted shaft. It is strictly forbidden to knock with a hammer, in order to avoid damaging the bearing and the encoder as whole. After a hollow encoder has been used for a long time, you should check whether the screws fixing the encoder are loose.

Figure 1: Lika hollow shaft encoder C50-Y-360ZNF26L3
1. Installation of Hollow Shaft Encoder
1.1 Method 1 of Installing Hollow Encoder
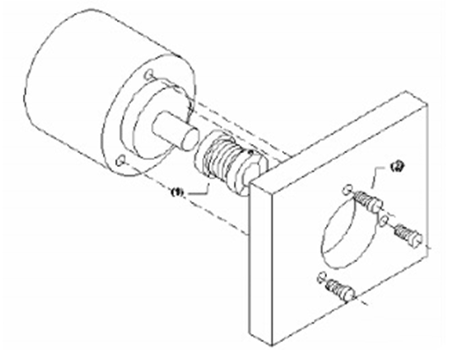
* You should first fasten the drive shaft on the equipment and DO NOT connect the encoder directly with the equipment. A flexible coupling is usually used.
* Install the coupling (1) onto the encoder. Please pay attention that the coupling does not touch the encoder surface.
* Push the servo clamp ring (2) with screw (3) onto the surface of mounting flange, but do not lock the screw.
* Rotate the servo clamp ring (2) to push the encoder into place.
* Rotate the servo clamp ring (2) into the servo sleeve, and tighten it slightly.
* Fix the coupling on the drive shaft (1) and minimize the angle and horizontal alignment errors to ensure that the installation error of coupling and encoder is within the allowable range.
* Lock the three screws on the servo clamp ring.

Figure 2: Installation of hollow shaft encoder.
1.2 Method 2 of Installing Hollow Encoder
* As the same with the former installation method, you should first fasten the drive shaft on your equipment, and DO NOT connect the encoder directly with the equipment. Please use a flexible coupling.
* Install the coupling (1) onto the encoder. Please pay attention that the coupling does not touch the encoder surface.
* Push the encoder with coupling (1) into place.
* Fix the coupling on the drive shaft (1) and minimize the angle and horizontal alignment errors to ensure that the installation error of coupling and encoder is within the allowable range.
* Secure the encoder to the mounting flange.

Figure 3: How to install hollow shaft encoder.
2. Common Problems of Hollow Encoders and Solutions
2.1 Loose Mounting
Loose mounting of the hollow shaft encoder will impair the position control accuracy of the encoder, resulting in the position deviation to be out of tolerance during device stop and movement. It may also make the servo system to sound overload alarm as soon as the device is started. Therefore, before using the hollow shaft encoder, you should make sure that it is installed firmly and reliably.
2.2 Faults of Connecting Cable
The probability of connecting cable faults is the highest, and they often occur in maintenance. This kind of faults are of the priority factor in inspection. Generally, for the problems of short circuit, poor contact of the encoder, or circuit break of the cable, you can simply solve them by replacing the encoder connector or cable.

Figure 4: Baumer hollow shaft encoder HOG 9 DN 2048 I
2.3 Wiring Error
During the installation of hollow shaft encoder, please make sure that the end connection of each pin of encoder is correct. Otherwise, once there is wrong wiring, it will lead to incompatible operation between the lines, or unstable pulse waveform signal of the encoder, resulting in accurate deviation of measuring data. In serious circumstances, the encoder may be damaged directly.
Therefore, please pay more attention to the wiring when installing hollow shaft encoder.
2.4 Power Voltage Lower Than +5V
This means that the power supply is lower than + 5V. In general, the normal working condition of the encoder can not be lower than 4.75V. The reasons for the low power voltage may be the power supply failure, or the loss caused by the large resistance of the power transmission cable of the encoder.
To solve this problem, it is necessary to repair the power supply or replace the cable.

Figure 5: Autonics hollow encoder E80H30-100-3-T-24
2.5 Battery Voltage Drop
This kind of problem usually occurs with a clear alarm. You should replace the battery to solve it. If the memory of the reference point is lost, you will need to take the procedures to make the encoder return to the reference point.
2.6 Errors of the Encoder Itself
This type of problems mean that there are faults with the hollow shaft encoder itself or its components, and the encoder can not produce and output correct waveform.
For this fault, you need to replace the encoder or repair the internal components.

Figure 6: Autonics hollow shaft encoder E80H30-1024-6-L-5
With our brief explanation, you should have learned how to install a hollow shaft encoder and common troubleshooting.
There’s still one thing we want to emphasize - since the hollow shaft encoder is usually connected with the main shaft of the equipment and the load of the main shaft of the equipment is impact load, when installing the hollow shaft encoder, you should not turn the fixing screw too tightly. Otherwise, there will be no space for the adjustment of the spindle, and the encoder can not rotate, and it will easily send pulse signal by mistake.


